Monday 29 April 2013

Getting to know me

I have recently been asked to write a guest post for my Craft Swap partner who blogs over at Modern Vintage Cupcakes.  If you'd like to meet another blog writer from New Zealand, and haven't already met Kat and her wonderful creations, then do go over and have a look around!  If you're curious to know a little more about me, then you're more than welcome to read my guest post that appears on her blog.

Seems as though there may be something in the wind: a number of people are keen to get to know a bit more about other blog writers; their likes and dislikes beyond and outside of creative stitching.  Recently I have very kindly been nominated for the Liebster Award.  One thing that is nice about this Liebster Award is that it does provide an opportunity to show somebody you appreciate their writing.   And for that, I am really honoured and touched to hear that the following three bloggers enjoy reading my blog enough to have recently nominated me:

Danielle from One Small Stitch
Helen from Grosgrain Green
Hazel from Disaster in A Dress

Thank you very much ladies!


I have done a bit of googling and it seems like this is a bit of a chain letter.  Unfortunately, a long time ago, I decided against ever participating in chain letter style things so I won't be passing this on any further.
I hope nobody minds.  But in the spirit of "Getting to know me" I have decided to answer the questions from the lovely ladies above anyway.

So to finish off, here are my very brief answers to the questions from Danielle:

1. Why did you start sewing?
My Mum sewed and I wanted to make things too
2. Five words that describe you:
This is the hardest question, so I will just be kind to myself
creative, thoughtful, stickler, organised, fun
3. What is your favourite make?
An 1850s dress

4. And your least favourite?
The Sorbetto top
5. What piece(s) of sewing equipment (besides your machine) could you not live without?
Quick Unpick
6. What are your three favourite blogs?
Did You Make That?  
Flossie Teacakes 
 Kate Davies Designs
7.  What accomplishment are you most proud of?
University Degree
8. Sweet tooth or savoury?
Sweet
9. What's the most daring thing you've ever done?
Moving to Scotland
10. What's your secret for a happy life?
Make sure you like yourself at all times

Alison's Questions that are different to those above:  

2. What's your favourite part of sewing/making?
I really love the thinking and the planning the most.
3. And least favourite?
Finishing the seams
4. Who is your muse/style idol/style inspiration/style crush? Can be real or fictional. Famous or civilian.
Laura Ashley
7. What's your sewing/making bete noire? Your biggest challenge, or the thing you've been putting off?
Tweed waistcoat for myself
8. Where do you find inspiration?
Pattern Review and sewing blogs
9. Do you have any other hobbies, other than sewing/making?
Reading and keeping chickens
10. What is your sewing set up? Do you have a dedicated sewing space? Are you relegated to a corner of the living room?
I have slowly taken over the guest bedroom and have a desk and a few hatboxes for fabric storage in there.

And here are Hazel's questions that are different from the other two:

2. If you could live anywhere in the world, where would it be?
I'm living the dream - I've always wanted to live in Scotland
3. Online fabric shopping: yes or no?
Yes - I live rurally so have to rely on online shopping
4. What essentials could you not leave your house without?
wallet and glasses
5. Who are your fantasy dinner party guests?
L.M.Montgomery, Louisa May Alcott, Jane Austen, Charlotte Bronte
6. What inspires you to craft?
I like pretty things and saying that I made them myself
7. What is your most visited website?
Amazon
8. What are the top 5 most played songs in your iTunes/Music library?
I like recordings of Women's Hour from BBC4
9. What is the background on your desktop/phone home screen?
Photograph I took of a local river
10. What is your favourite TV programme?
Great British Sewing Bee at the moment
11. Do you prefer working stretch or woven fabrics?
woven

If you did click over to My guest post, and are still reading here, then I thank you very much!  Please leave a comment to say "Hi"

Saturday 27 April 2013

Tumbling blocks Quilt

W.I.P.

I have been working on this 3D cube quilt a little more lately and have posted about it previously.  It is a house-warming gift for a lover of all things blue.  
I knew it wasn't really big enough and I wanted to add more 3D cubes, but I didn't quite have enough of the medium tone blue.  So I have had to introduce a new medium tone that is similar in colour.  Because I didn't want to only have the new fabric at one end of the quilt, I have needed to unpick quite a few triangles amongst the strips so that the new fabric will be spread out amongst all the shapes.

I also wasn't sure how to treat the 3D cubes at the bottom end of the rows, whether to cut them off flush or to let them complete their shape.  I decided I want the cubes to really stand out, so I have let them complete their shapes.  I cut 2 and 1/4" strips of grey, then cut out triangles with a thirty degree angle and added them to the end of the strips. 


At last - all the strips are sewn together!

I asked my Mister for his opinion about finishing the left and right sides of the cubes, and he suggested not having sliced-through cubes, but letting the cubes finish themselves there too.  Oh no - two more strips to add!  But it does look better having no cubes cut in half.


Next step will be to add a grey border to match my 30 degree triangles and trapezoid shapes.  I am going to make it so that the total will be 60"x 60", so two borders will be slightly thicker than the other two, but overall it will become a square.  THEN to add the wadding, backing, and do the quilting!!

To see the next steps and the final quilt click here.

Tuesday 23 April 2013

Buzzing with News


 - NEWS FLASH - UK SEWISTS - 
They are already recruiting for a second series!!!!  Head over to this page to see what the application process involves!!!!  
Are you up for it?  
Phew!  That was an exciting News Flash!  
The Great British Sewing Bee TV program is airing tonight and it is the final episode.  With Sandra, Anne and Lauren all sewing a man's shirt for their pattern challenge, doing some hand sewn embellishment on a bag and finally creating an evening dress.  There is no prize, just the honour.
So, here are some links to the three lovely lady finalists:
Anne Rowley has been sharing lots of insights on the program here at artisanssquare, including the fact that the first two episodes were actually filmed consecutively over a 5 day period!!  No wonder they're so exhausted!  I am sure she will have a lot more interesting things to share with us after tonight's program.
Lauren Guthrie has been sharing her experience on her blog Guthrie & Ghani, and is very busy at the moment preparing to open her new haberdashery shop in Birmingham this weekend.  Apparently Sandra, Stuart, Tilly and Ann will all be there on Saturday's Grand Opening!  Wouldn't that be a lovely place to be!
Sandra Lavender doesn't have an online presence (that I can find) but is a very funny and entertaining lady and I wish her all the best in whatever she does with her life - a mother of three girls is a busy job all on it's own!

In case you are interested, there is also a website for Tilly, one of the other contestants, and the behind-the-scenes person who created all the sample garments and timed all the tasks also has a blog with insider's tips.  Her name is Claire-Louise Hardie and she writes a blog at The Thrifty Stitcher.

Personally, I don't mind who "wins" the show as they have all given a lot of their time, energy and reputation to become ambassadors for home sewing and to try and encourage more people to enjoy creating things with fabric.  In fact, all 8 of the contestants have done this, so I thank them for raising the profile of sewing - I am sure all forms of sewing and stitching will benefit from this program in some way.  It has been so much fun to watch sewing on the Telly and I have looked forward to each Tuesday night in ways that I have never looked forward to TV before - almost as if little parts of me were going to be on the screen - wierd.  I guess it's empathy and understanding.

Now here's something else interesting

The lovely people at Simplicity read my blog!!  Can you believe it?!  They wanted to know if I liked the little girl's dress in the opening credits, and if I would like a free copy of the pattern!  
How amazing is that!?  Unfortunately I don't know any little girls to make this for so I declined.....then they asked if I had any Simplicity patterns on my wish list.  Do I ever!!  So here is what they sent me:

 and 
Lovely aren't they?  Not in my size unfortunately - but maybe they'll exchange them for me? Can't hurt to ask right?
In fact, on the Simplicity UK website, they are featuring some of the patterns used in the Great British Sewing Bee program on their Home page - including Sandra and Lauren's jacket patterns.
Really looking forward to this evening's program, hope you all get a chance to see it too - USA readers seem to be getting it on You Tube which is nice.  And looks like they will be making a second series for us to all look forward to.

Thursday 18 April 2013

Mad Men Dress

Firstly I must confess that I have NEVER watched an episode of this Television program and I have no idea what it is about.  The only thing I know is that the story is set inside an office.  Oh, and that the female characters all wear LOVELY dresses.  And that is the only reason I participated in this challenge - a chance to admire everybody's dresses and to have a go at making a 1960s dress for myself.
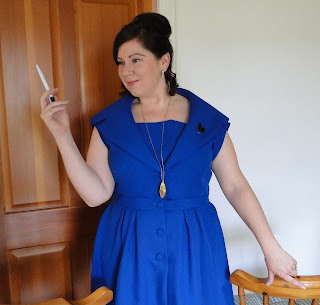
And here it is!  I am trying to pose like Joan in the inspiration dress.


As you can see, my dress is definitely lower in the bust (thank goodness for the dickie!) and definitely far wider in the collar, but I really wanted to have a try at this pattern and I thought nobody would mind if I did an "inspired by / homage" instead of a "replica" dress.  Plus, the pleated skirt suits my current figure better rather than Joan's tight-fitting skirt.

I used Butterick 5747, which is part of Butterick's Retro 1960 re-released pattern collection.

Here are a few photos of some of the details:
This is the front waist band.  I accidentally neglected to cut the waist band pattern piece to the correct size and ended up making the largest size.  I didn't even notice until I was handsewing the band facing down.  But I kind of like it, in a way it looks a bit like a belt.

This is the back - the sleeves have a slight curve out under the arm which I quite like too.  And of course I love the pleats!  There are even pleats covering the side seams!
(Gosh - I'm so peely wally!)
And here is a quick photo of how I will probably really wear this dress in real life.  With such a cold Spring so far, a long sleeved top underneath it will be mandatory.
sorry for the poor lighting
 - it's still cold and grey here in Scotland.

I wore it again on a sunnier day!

This dressmaking challenge has been hosted by Julia Bobbin. I am really looking forward to seeing everybody else's dresses in one of her upcoming blog posts! The BIG REVEAL is posted here!

Tuesday 16 April 2013

International Craft Swap

I have made a little gift for a clever sewing blogger in New Zealand, as part of House of Pinheiro's International Craft Swap.  The idea is to hand make something Nautical and add this to a small gift for an international sewing enthusiast.  Everybody who wanted to participate was paired up and I was partnered with the very talented Kat from New Zealand.
Kat has an amazing collection of vintage patterns, so much so that she runs a separate website just to catalogue them all.  She is also very organised with her fabric and notions collections.  Such an organised and imaginatively creative person could surely want for nothing that she couldn't create herself...
So instead of looking at her sewing world, I took my inspiration from the recent addition to her home, a lovely baby boy.  This gave me some direction to chose bright, bold blues but not what to use them for.  Then I asked the blogging community for some help, which turned up this little gem:
Nautical detail of my International Craft Swap.

Can you guess what it is yet?


Lunch bag made at Nessa's Place for Kat.
This is a lunch bag meant to carry those square compartmentalised Bento boxes.  It has a drawstring lid to keep things from falling out.
Really it could be used for anything = small crafty projects or even for little boys to collect all their toys and treasures inside.  I'm sure there will be lots of uses for this Nautical bag.  I hope Kat finds it useful.

The lunch bag has a draw string opening and is fully lined.
The tutorial is from Ayumi's website the Pink Penguin.  It is a well written and clearly photographed tutorial.
I did make a practice one before I made this one, which I blogged about previously.

In Conclusion

This challenge brought up lots of food for thought.  What to make for someone who can make things for themselves, along with a lot of 'what will she think' worries.  But in the end, it is only a small gift and it really is the thought that counts - the idea of having a handmade gift arrive in the post from the other side of the world, a special something that somebody has put a lot of thought and time into creating, just for me.  That is a heart warming thought in deed.
And finally, the 'what will she think' worries?  I have learnt that all sewing bloggers really want to encourage and support one another with kindness and a generosity of spirit.
...Now let's just hope the Postal Service doesn't let me down...I haven't heard if it's arrived yet..eek!
IT HAS ARRIVED! Yay!  And Kat likes both the bag and the little gifts I sent.  She is planning to take her lunch to work in this tomorrow.  Success.


Friday 12 April 2013

Tumbling Blocks Quilt

A Work In Progress

Lately I have been working on a house-warming gift for a grown-up niece who has just bought her first home.  I wanted to make her a quilt for snuggling on the couch with.  I don't know if she even likes quilts but they are homey and cosy so perhaps she'll appreciate it in the future if she doesn't right now.
The idea came from some of the things that I know about her.  She studied Interior Design at University and in her final exhibition she used hexagons divided up into parallelograms.  Plus her favourite colour is blue.
I saw this tumbling blocks pattern in one of my quilt books and decided to have a go at it.  If you squint your ideas it becomes 3D cubes, or you can see hexagons or even stars!  Here are the pieces laid out so far.
It actually isn't really big enough at the moment, so I am considering introducing another turquoise fabric so that I can make the strips a bit longer. Also, I am going to unpick the turquoise triangles on the very left and restitch them onto the right, so that the edge will finish with neat block shapes.

The Process

I am going to record how I did this in this post, mostly for my own records, but perhaps somebody else might be interested or curious too.
You need to choose fabrics that can be grouped into dark, light and medium tones.  I used just one fabric for the medium tone, and it needs to be a pattern that isn't too noticeable.  I used 1.5 metres of medium tone, 1 metre of darks and 1 metre of lights.  Cut the darks and lights into strips that measure 2 3/4" wide and the medium tone needs to be cut at 3 1/4" wide.
Second: Sew the dark and light strips either side of the medium strips until they are all sewn together.  Press the dark pieces towards the dark and the light pieces towards the medium.
Third:  Cut the strips at a 60 degree angle.  Darks get cut sloping up to the left, lights get cut sloping up to the right.  Cut at 2 and 3/4" intervals so that each piece is 2 3/4" wide horizontally.
Fourth: Now cut the medium tone fabric that is in the middle into a perfect triangle by cutting from corner to corner.
Fifth: Sew a dark parallelogram and triangle to a light parallelogram and triangle.
 When you sit them 'right sides together' they will always have these little 1/4 triangles poking out.  Try to sew a 1/4 seam where the little dog ear meets the top fabric.
Again, press dark seams towards the dark and light seams towards the medium.
Sixth:  You will end up with lots of these units.  They are all the same really, if you turned the top pile around it would be the same as the bottom pile.  But I separated them to stop myself from getting confused when I lay them out. 


 Take the pile that starts with a triangle on the left and lay them down in a row of four.
Then take the pile that starts with a light parallelogram on the left and lay them down in a row beneath your first row. You will see that a dark is always lined up with a light beneath it.

Seventh:  Once you are happy with the layout and you have checked that they all match, start sewing the rows of units together.
The first picture in this post was after I had sewn the above pieces into strips, just to get an idea of the overall layout.  I am looking forward to getting all those strips sewn together to see if it all really does line up and look like tumbling blocks!

To see my next steps in the process, please click here.

Tuesday 9 April 2013

Teaching a Friend to Sew

Does this sound familiar?
Friend: Oh I love your dress!
You:  Thanks - I made this myself.
Friend: WOW!  That's amazing!  I wish I could do that!
You: You could!  If you find a pattern you like, and buy the fabric, I could help you get started.

Then after this, usually I never hear from them.
But for once, someone genuinely wanted to learn how to sew and took me up on the offer!  Unbelievable!
Back in September 2012 we went shopping for a pattern and a fabric together, but ever since then, because of clashing schedules and cancelled plans we haven't been able to get together to get it started.  So it was this weekend she and her husband came to stay for the weekend.  Whilst the men talked about painting and went on a country walk, we got started on cutting and sewing.

Sewing School

I was able to help her consider the measurements on the pattern envelope and compare these to the final garment measurements written on the actual pattern pieces, to decide on a size to follow.  We cut out all the pieces and then stopped for tea and cake.

Can you believe her first instructions were for curved seams for the front and back bodice!!  And she did a great job.

I did the hand basting whilst she went onto doing the skirt - this was very kind of me as I NEVER  baste.
The front of the skirt has three panels that then get folded into two front pleats!  More great stitching.
two front pleats

And the back two panels have darts.  So including the lining, she sewed four darts and eight curved seams!  And all this from a girl who has only ever sewn cushions!
four back darts and room for a zip

Of course I taught her to snip all threads and press every seam as you go.

We will be attaching the sleeves, collar and zip sometime in the near future, when I'll be able to show you the finished garment.
Really I should have made her choose a much simpler pattern that had no lining, darts or curved seams, but I felt that she should begin by making something that she REALLY wanted to own and that she'd love.  Wanting something fabulous, finished and wearable is a great motivation to learn sewing skills.
We are making view B of Vogue 8667

I am really pleased to have been able to share my knowledge and my love of sewing with someone so keen.
Don't you just wish that everybody could have that warm satisfaction of learning how to create their own clothes?  What do you say to people who, after admiring your handiwork declare a wish to create?


Friday 5 April 2013

My Fancy Magic Marking Pen

Now this is one dressmaking pen that you will love!

It is not specifically designed for sewing, but many people do use it on material, and for a very good reason...

IT CAN BE ERASED WITH AN IRON!!!!!  

How fantastic is that?!


Here is a little video I made using the pen demonstrating how unbelievable it is:


(I chose the demonstration fabric because it was cute, but just to let you know, it does already have little black flecks in it, and these weren't made by the pen)
I bought this as a 3 pack in the stationery aisle at the supermarket, for about £6.  A while ago I'd been told about them by a quilter, but this week has been the first chance I've had to actually go into the supermarket and see them for myself.  (We get our groceries delivered usually, so I do miss browsing the aisles)


Usually I use tailors chalk for dressmaking and a fade-away pen for crafty things, but sometimes the chalk doesn't go away until I wash the garment and every now and then I press too long with the fade-away pen and it doesn't fade away.  Hopefully this will be my new go-to fabric marking pen.
Would be interested to know what marking tools you favour!

Please note: I bought these pens at retail price with my own money, I am not affiliated with this pen making company (nor the iron company) in any way, and these words are all my own observations.

Monday 1 April 2013

At least the details are lovely

I spent a lot of time on this knitted cardigan and was really looking forward to seeing it finished.  I love the look and feel of double moss stitch and when I first saw this pattern with the lacy back panel I knew I just had to have it.  Doesn't it look cosy!  It's a Debbie Bliss design, published in her book Amalfi.


But in the end I am very unhappy with this cardigan.  Even though I knitted it a size smaller than the measurements indicated would suit me, it still came out far too big.  I have since washed it a few times in a very hot wash to try and shrink it, but it has not worked.  I used the specified yarn and everything!

This is what it looks like in the pattern book, as though it should be one of those cardigan/jacket garments that you can just throw on and wear with ease.  But it isn't.
Shoulders. It is so heavy that it always wants to drop down the front.  I am forever readjusting the shoulder seams to stay on the tops of my shoulders.
Collar.  It is always trying to sit upwards and never sits down.  I am going to try and tack this collar down, just so that I can fuss less over it.
Bust.  Despite this being far too big for me, the buttonhole section still gapes and pulls!  And for the first time ever it isn't the fault of my bust.
Sleeves.  These are just too baggy and too long.  I have to wear them folded up at the cuffs.  If only they'd been knitted downwards, I could have unraveled 10cm and cast off.  Unless this is possible? anybody?

On the plus side, I did enjoy knitting the lace panel at the back.

And I do love the wooden buttons.


And I am proud that I made it all by myself.


I hope I can salvage this and turn it into the cosy,"just-throw-it-on" cardigan that I fell in love with.

Related Posts Plugin for WordPress, Blogger...