Thursday 3 December 2015

Star Wars The Force Awakens : The Skirt

I have made a gift for a Star Wars fan!
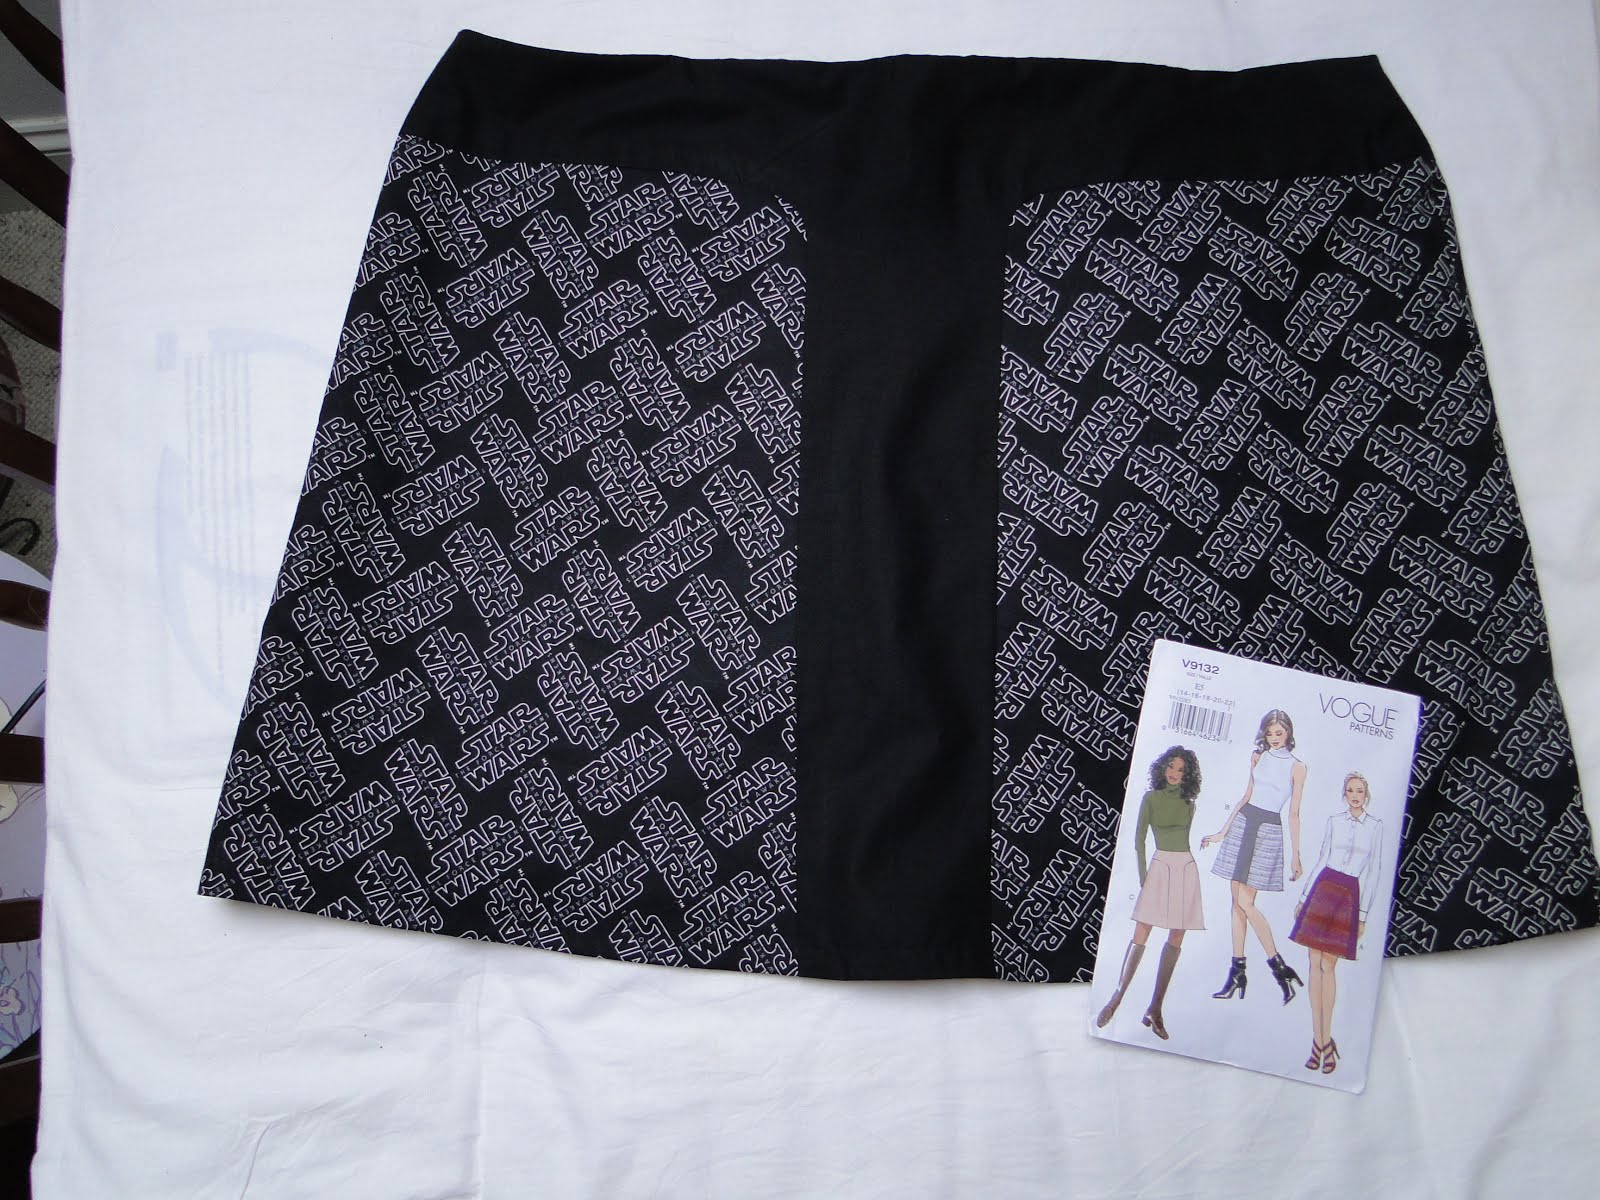
The lines and style of this skirt reminded me of Boba Fett's helmet so I knew I couldn't go wrong with Vogue pattern 9132.


Some changes I made

It is a very short skirt, so I added two centimetres to make it 50cm in length, but even then it was still a bit short so I used bias tape along the hem and just turned it up 1/4" instead.

I didn't use the recommended fabric, which is "Gaberdine, crepe, linen, lightweight woolens" I used cotton instead.  I really like that it looks a bit like a check pattern from a distance and you only see the logo close up.  The Star Wars fabric is a fully licensed product from Camelot Fabrics

The skirt pattern is for a fully lined skirt.  But I couldn't believe there was no separate lining pattern piece!  The instructions ask you to use the same pieces for the skirt!  Can you imagine doing four more of those curves in lining fabric?!  No thank you!  So I made the skirt pieces up, front and back(including the zip), then before sewing the side seams I just lay the skirt front on top of my lining fabric and cut out a piece exactly the same size.  I did the same with the back. It fit perfectly when I sewed the lining to the skirt at the waist band.

Some tips if you are going to sew this pattern

Sewing these curves was a bit of a pain, I had to undo all four of them and try again.  If you make this skirt I would recommend after stay-stitching and then snipping the curve on the T-shaped or L-shaped fabric piece, have it underneath when stitching together.  Stitch slowly, hold each fabric and slowly bring them together under the foot.
Not perfect

Also, the little triangle pieces that are supposed to line up - they didn't.  Whichever end I started at, the first two little triangles matched up but after sewing the curve the second ones never did.  But by the time I stitched all the way to the ends of the fabric it matched up just fine at the ends.

I also thought it was quite an exaggerated A-line, so once I got my friends waist and hip measurements I just drew a straight line down to the hem instead of sticking to the wider hem line for her size.  I think I brought it in 3 sizes at the hem.

I do hope she wears it to the premiere of the new movie, as she has reserved tickets for a VIP theatre on the night of it's release!  Fingers crossed it fits!

Sunday 30 August 2015

Metro Rings Quilt

I have finished my nephew's wedding ring quilt, just in time for their first year anniversary!

I have written about the construction details of this quilt in a previous post if you are interested.  For today's post I am just sharing photos and close up details, as I am very proud of this make - can you tell?

The backing I chose for this quilt is the same Terra Australis design and is in coordinating colours.

I chose a trailing love heart design for the quilting, and had it done for me by a long arm quilter.  I know there are so many other intricate designs that compliment the wedding ring quilt that are so much better, but they do take more time and therefore cost more money.  Quilts are already very expensive to create, so I chose something romantic and swirly and I am very pleased with it as it is.
sorry about the poor, yellow lighting in these two photos,
but they do allow a close up of the quilting


Ta Da!
Now off to write a card and wrap it up!


Thursday 6 August 2015

Cross Stitch

~The handy sewing project for those days/weeks that you don't feel like sewing!

This summer I have found that I don't want to sew anything on my sewing machine.  I don't even want to sit at the desk or even play with my fabric collection!  But hobbies can be a bit like that, they seem to have moods and preferences all of their own.  So instead of doing nothing at all, I decided to see if there was a cross stitch pattern that I might like to try.

And then down the rabbit hole I went!  Have you ever seen the world of Floss Tube?  (It's a # term you can search for on You Tube - go on, I dare you)  It's full of people sharing their cross stitching WIPs, stash, plans and having sew-alongs together.  Most videos are a crafty woman looking at the camera and holding things up to show you something every now and then.  Some of them are really pleasant to listen to whilst stitching, a bit like listening to a podcast, but I can just look up when they say they're about to show you their piece of work.  Some of the videos I have to skip due to the large amount of "Ums", (it's something that jumps out into my ears and I just can't bear) but most of them are enjoyable, some are informative and some could even enable more spending!

So, here is what I am working on this summer: Mermaid of the Pearls by Mirabilia Designs
 I took a photo after each day of stitching, some days I did none, some days not much and some days a whole lot was accomplished.
Sessions 1 - 5

Sessions 6 - 10

Sessions 11 - 15

Sessions 16 - 20

The original design's face just didn't appeal to me so I changed it slightly and much prefer my changes.
I drew the original design on the graph paper to the right,
then kept the chin and lips on my drawing on the left
and drew my own nose, forehead and eye.
Now I am up to working on the armful of treasure.  It's slow going but I am really enjoying it.  Cross stitch is very relaxing and the slow growth and unveiling of the finished piece brings me a lot of joy and satisfaction.


P.S. For my own records:

I have done a Mirabilia Design before (2002) and it is hanging proudly above my bed.  She is called The Dreamer (this chart is now out of print).
She's very peaceful looking and I love all the rich colours used.
apologies for the glass glare

Friday 29 May 2015

Jacobite Shirt dress

I really love the McCall's shirt dress pattern 6696.  I have made it once before but that was in a floaty cotton lawn.  This time I have made it in a gorgeous chambray.

The Pattern

I have always loved Scotland and now that I am fortunate enough to actually live here I don't feel the slightest bit silly to still want to wear thistles or tartan in some way!  This fabric is called Botany and I love the swirling leaves, stems and thistles travelling every which way all over the fabric.
How great is this photo angle?!  No idea how this
happened, but I like it!
The pattern calls for the waistband, button band and collar stand to be hand stitched down on the inside but I decided to topstitch these instead and am quite happy with the way it looks.

The back has a yoke across the shoulders and a gathered billowing section that appeals to me for both the ease of movement and for the appearance of a narrower waist!
Here it is from the front without the belt.  I probably won't wear it with a belt myself.

The Fit

When making clothes for myself I often just go for the largest size and hope for the best.  I think really I could have made this a bit smaller.  I can easily pinch out 2 inches at the waist with my hand and the shoulder looks like it is slipping down my arm.  Also, there seems to be too much fabric from my underarm to my bust which could be removed using larger darts.  I did loose a stone (14 pounds) between planning, cutting and sewing this dress whilst trying the whole30 eating plan, and I made absolutely no attempts to fit this dress to myself at all.  I just made it straight from the envelope.

Next time I make this dress I shall try a size smaller and really make sure I am happy with the bodice and bust before continuing.
But I will most definitely still wear this dress, flaws and all!

The Fabric

The fabric is a fawn, light khaki colour with a solid black print on top.  It washed really well and didn't fade at all!  It is a design by Alison Glass as part of her Ex Libris fabric collection.  As soon as I saw it I ordered it straight away!  It comes in a choice of three colourways too.  I saw a beautiful table runner made on Instagram by Jamie Naughton using the blue colourway but she had embellished it with a rainbow of moths, also from an Alison Glass Ex Libris print.  I am seriously tempted to add some of these to my dress too!
And so, despite some fit issues, I really love this dress and am so pleased to finally be able to wear it!  It will get it's debut next weekend for our wedding anniversary. And maybe with the belt!

Sunday 17 May 2015

The Results of my Own little Craft It Forward project

At the end of last year I was lucky enough to receive a beautiful handmade bag from Fiona at Celtic Thistle Stitches because she was doing a little Craft-It-Forward project and I happened to be one of the first commenters.  So recently I also offered to make three crafty things for the first three people to comment on my blog post, and now that Fiona and Jen  have received their gifts from me, (hopefully Kirstin receives hers soon?) I want to share what I made!
These are pincushions with hanging pockets and a loop to hold onto a bucket for collecting threads and trimmings.  I got the idea from Lynz when she made a very snazzy one for her own craft room, and I'm so grateful that she linked to the instructions - a great tutorial from Elizabeth Hartman.  The pin cushion is weighted down with rice and has a felt strip down the middle for sewing needles.  It is attached to a hanging pocket that can sit next to your sewing machine or on your armchair.  There is a loop to attach the threads bucket, but if you aren't using it then the loop tucks in to one of the pockets.

Fiona loves Tula Pink fabric as well as lime green, so this will be hers:
Fabric: Tula Pink, V&Co.


Kirstin loves bold colours, feminine Ulyana and knitting, so this will be hers:
Fabric: Katarina Roccella


Jen lives by the beach and looking at her blog seems to favour aqua colours, so this is hers:
Fabric: Katerina Roccella


It was really nice to look at these creative lady's blogs and decide what colours and fabrics they might like.  I enjoyed thinking about something crafty and useful that people who sew may like to have too.

Now I can't wait to see each of these blogger's Craft-It-Forward projects!
Feel free to follow them and sign up when they post their own C-I-F!
Fiona blogs at Bendigo Lioness
Kirstin blogs at Sew Classic
Jen blogs at Quilter in the Closet

Monday 4 May 2015

Baa-ble Hat

To promote Shetland Wool week Donna Smith has designed a free knitting pattern for download.  As soon as I saw it I knew I wanted to give this a go, as I love sheep and especially these little black faced sheep which I get to see quite a lot where I live in Perthshire, Scotland.

I have only ever knit one other hat using this stranded colour work technique, and I am happily surprised that once I had the needles in my hand it all came back to me and I hadn't forgotten anything!

Technique

I used a short length circular needle for the entire hat, but when I got close to the crown and there weren't many stitches left I used the 'magic loop' technique where I just pull some of the needle cord through any gap in the stitches to make the knitting into a triangle shape.

I also keep the main colour I am using for each row in my right hand and knit as normal, and the additional feature colour I keep on the left side.  When I enter my right needle into the left to start a stitch I simply loop the yarn over from the strand on my left.  When it comes to a gap of more than 5 or 6 sttiches all I did was pick up the ball of yarn from my left side and take it under and over the looping strand on my right side.  (I should have taken a video I guess).
Here is what the inside ends up looking like:

Perfect for Scottish weather, as it almost acts as two layers!  I used the recommended yarn and colours, and bought it directly from Jamieson's of Shetland.  But there are already so many other gorgeous Baa-ble hats to be seen in an array of colours using the hashtag #baable on social media.

This will be the first pom pom I have ever worn!  And I don't feel one bit silly, instead wearing it makes me feel proud of my ability to make such a fun pattern with such beautiful wool.
Bird's eye view


Gamboling sheep in all their glory, front and back.


Wednesday 15 April 2015

Sew Kind of Wonderful

I have been working on this lovely quilt off and on for quite a while now.  It was supposed to be a wedding gift but will now be a First Anniversary gift and should be quilted and bound by August, hopefully.  I just finished the top today!  With the sun shining through the window you can see the seam allowance is creating a stained-glass-window effect.


About the Quilt

I was generously gifted the specialist ruler called the "Quick Curve Ruler" by a sewing-bee friend named Raquel in America, which was especially nice as I had tried to get one sent to me here in Scotland and just couldn't source one at all.
The ruler as well as the pattern are from Helen and Jenny at Sew Kind of Wonderful.  The pattern I have used looks a lot like a traditional wedding ring quilt and is called Metro Rings.
I chose to use a fat quarter (FQ) bundle of fabrics called Terra Australis designed by Emma Jean Jansen and purchased from the only UK stockist The Crafty Quilter.

About the Process

I am leaving out any specific measurements and amounts as the pattern has very specific details and instructions, is a good price, is well written and extremely easy to follow.  I highly recommend it!
First I set aside two pink and two green FQs for the corner squares, the rest I cut into strips and stitched together in rows of 5.
The pattern is full of excellent cutting instructions and diagrams, but as I am left handed I do need to concentrate on the diagrams and reverse them in my head so that I can cut with my left hand and hold the ruler with my right.  Next was cutting the arch shapes.
Cutting all of the background fabric into squares, rectangles and triangles and then using the curved ruler on one edge of those shapes took a very long time, but finally, all my pretty piles were ready for assembling.
First job was to sew each colourful arch together with a triangular arch above and a rectangular arch below to get the new pointy blocks you see here on the right of the photo.  Then lots of trimming!
Next job was to pair them up and sew them together along the straight edge of the small blue arch piece.  I laid them out to try and make sure I had them randomly paired up.  This is not even half of them!
Here they all are, paired and ready to be sewn!
Once they are paired up and pressed open it was time to add on the triangle corners.  

Then at last I had a great collection of square blocks!  -  my eye blocks.  And of course lots more trimming to be done too.

Then sewing these eye blocks into pairs, then into sets of fours was fairly straight forward.  I concentrated on getting the triangles to match up and didn't worry about the blue background fabric matching up in the middle.
And finally today they are now in rows!
Next step will be to prepare the backing and then quilt it ready for gifting in August!

Conclusion

I am really pleased with how this has come together.  Fortunately I quite enjoy the cutting and trimming process, as there is a LOT of cutting and trimming in this pattern.  Though it is very helpful that after sewing each step you can relax a little about your accuracy as there is always pressing and trimming to make it all measure up correctly.
I would recommend this pattern to people only if you enjoy/don't mind cutting and trimming and are happy to spend an entire 'crafty session' not even touching your sewing machine.  Also just loving the idea of this pattern really motivated me to keep going with the process as I really wanted to see how it would all turn out.  I love the idea of this looking like the traditional wedding ring quilt, with lots of interlocking rings made up of many small pieces.
The curved sewing is no trouble at all.  It is a very gentle curve and can easily be maneuvered by holding the top piece in your left hand and the bottom piece in your right hand.  Just help the two edges to line up with one another just before they head under your sewing foot, and stitch at a medium pace.  Jenny has a video to help right handed people (it's practically the same, but actually easier for left handed people, as the dominant hand needs to be holding the top fabric which is on the left! easy for lefties)  Don't worry too much about accuracy at either end, as they get trimmed anyway!
Let me know if you have been tempted by this pattern, and feel free to ask any questions, I'd love to help if I can.
Related Posts Plugin for WordPress, Blogger...