Showing posts with label WIP. Show all posts

Thursday, 23 January 2014

The Easiest Quilt Top EVER

This is a patchwork quilt top using two 5" charm packs, and adding a few other bits and bobs I already had for a border.  This is a quick and easy way to make a quilt, especially if you have never done one before but have been seduced into buying some of these deliciously tempting little bundles of coordinating fabric!
  If you have bought a 10" layer cake bundle, then you will end up with a lot more diamonds, tripling  the size of your quilt!  Just cut the 10" fabric into 5" squares first and keep going til it's all gone.

1.  Split your bundles into large prints and small prints and pair the small prints up with their twin - you will have two of each fabric if you have bought two charm packs.
2.  Cut the two smaller print squares into triangles and pair them up with a contrasting large print square.
3.  Sew a pair of triangles using a quarter inch seam allowance to either side of your square and then press it open.  See the left hand side patchwork blocks in the next two photos.
4.  Sew the other pair of triangles to the other two sides of your square and press this open.  See the right hand side patchwork blocks in the next two photos.

5.  Trim off all the little dog-ear triangles that are hanging out along the outside edges, then arrange all your blocks into rows of any combination you desire!  I took a few photos of my layout so that I could check each square wasn't next to any similar squares and that all my dark colours were relatively spread out.

Yield

If you use two 5" charm packs you will probably end up with 28 blocks.  I added in some fabric squares of my own to make 7 more blocks.  If you use one 10" layer cake, and cut it up into 5" squares, this will probably give you 56 blocks.

Border

As I had a few other bits of fabric already I used these to create a border of 2" strips cut on a 45 degree angle, but you could do anything or nothing for a border and it would still look impressive!


Now to purchase some backing fabric and get it quilted!  This is going to be a gift for a very dear lady.

Sunday, 12 January 2014

Winter Sewing Plans

There have been so many year round-ups and year-long resolution plans in my blog reader!  But I am not going to layout a whole years worth of goals as you never know what is around the corner.  So I am going to keep my goals seasonal.
Winter is the perfect month for any and all forms of stitching.  Dark and cold outside, warm and glowing inside.  I am hoping to get a few things finished before the end of March, and am linking up this list of goals with Katy's Finish-A-Long.  My goals for Winter are as follows:
1.  To turn this lovely tartan wool fabric my Mister gave me as an anniversary gift into a long skirt.  I received this pattern as a gift from Jeri.

2.  To finish all the applique blocks for the In My Garden quilt I've been working on for a long time now.  I'd be really thrilled to get the last four blocks of the patchwork top all completed by March.  As I plan to hire the use of a long-arm machine to quilt some of it, as well as some hand quilting, I will save that part of the quilt finishing until the Spring.

3.  ClaireEPoppins gifted me a Moda charm pack, so I bought another one the same and have sewn  them into 35 square-in-a-square blocks.  I would like to get these sewn together and then come up with an interesting border to make it bigger and to have it bound and quilted by the end of March.  It will be a gift for an older lady friend.


4.  I'd like to use these Sweet Life fat quarters to create a baby quilt for a dear friend who lives far away.  I'd like to try the dresden plate idea for these too.


You might like to think about linking up any jobs that need finishing too, as there are prizes up for grabs for anyone who finishes the items on their list!  For more rules and info click here.
Finish Along 2014
Click here to go to the Link-Up


Thursday, 7 November 2013

Sewing and Pressing and Cutting OH MY!

I have been a busy bee over here at Nessa's Place!  Check out all of these pressed seams!

I have a number of sewing books on my shelves that I enjoy browsing but have never actually made anything from them - that was until I bought a Kaffe Fassett / Phillip Jacobs bundle of 30 fabric strips and needed to find something to do with all those lovely colours and patterns.  These bundles of 40 fabric strips are commonly called jelly rolls, but my bundle only contained 30 so I needed to find a pattern that could adapt easily to various quantities.
And I did find one!  The pattern I found for this quilt required only 20 strips of fabric, so I just made it a bit bigger to incorporate my 30 strips, and added a few extra in too (7 blue ones as well as background fabric).
Here I am sharing the process of creating this quilt, but feel free to just look at the pictures - they are fairly self-explanatory.  It really is just a LOT of sewing and pressing and cutting... oh MY!

Just the Preparation is a Mammoth task!

I started with two metres of white fabric and cut it into 44 strips of 2.5". 

Then I sewed my 30 colourful strips of fabric to either side of one white strip, and 14 white strips to either side of one dark strip (I had some dark toned blues in my stash so I used those - the original pattern used red and it looks great with red too)
PLEASE NOTE: If you are following this to make one yourself, I would like to say that I wish I had done 8 of the blue sets as I did end up with enough of the coloured sets to have made another row in my final quilt.  But this would also mean you would need a bit more white, so perhaps buy a quarter of a metre extra just to be sure.
Using a sharp rotary cutter and ruler, cut every single strip set into 2.5" wide strips.  This took HOURS!
I ended up with two lovely piles - 122 blue centres and 255 coloured sides.  Then sew them together to create a nine-patch block.
I was left with a very tall pile of 115 nine-patch blocks, with warm blue centres, all completed.  Now this would have been enough satisfying work for anyone.  But unfortunately the cutting and sewing isn't over!

The disappearing nine-patch

Now for more sewing and pressing and cutting...oh MY!
Using the clear ruler, I lined up the edges of the blue square on the 1" line and sliced every single one of these babies up!
After all of that cutting, and the removing of a few slipped and miss-cut pieces, I ended up with 457 usable pieces.
Now to stitch them into strips, with the little blue squares all facing the same direction.  I sketched out the book's layout onto some graph paper with the original 236 squares and then drew in my extra squares to make a total of 436. 

 (I knew I would have some leftovers so I took out my least favourite ones, but if you want to make it, you'll be able to use all your squares if you just do one extra strip of white/blue/white at the beginning)
This was always going to be 'on-point' so I needed to add setting triangles to each end of the strips. The longest strips are 25 squares wide!  (The setting triangles are created by cutting 5.75" squares then cutting these into triangles.  The four corners are made by cutting one 3.5" square and dissecting it into triangles)
At least now there is no more cutting to be done - just more sewing and pressing... oh Yay!
Hopefully this will be big enough to cover a single bed.

Now for the Quilting

Although I did toy with the idea of using this quilt as a vehicle to hire and learn how to use a long-arm quilting machine, I have decided not to do the quilting at all.  I haven't as yet found any love or joy from the quilting part of making quilts, so I will pay someone to quilt this little lovely for me - But first I need to find some backing fabric before I can make an appointment with a quilter.  I look forward to sharing photos of my completed quilt!
N.B. The Trellis Quilt is now complete!  View it over here.

Sunday, 22 September 2013

Autumn Sewing Plans

Fall Esssentials Sew Along 2013
I have decided that I need some motivation to get me back into some garment sewing, and I saw this and thought I would give it a try.  I enjoyed the camaraderie and support from previously joining a flickr group and so am looking forward to see how other people challenge themselves alongside my own sewing challenge.
The sew along challenge can be found written in full here.  There are 7 categories in total, but I am going to be sensible and am aiming to complete 4. So without further ado, here are my Autumn Sewing plans:

Under the category of Baby It's Cold Outside, I am going to make a Harris tweed waistcoat.  I already have the tweed as well as a blazer/jacket pattern that I can use if I leave out the sleeves.  I just need to find a gorgeous fabric to line it with.
V8333
Vogue 8333
The next category for me is Fabulous Frocks. I am going to make another version of my Highland tunic.  I think I will do it in a navy knit if I can find a nice thick one and will omit the collar and sleeves so that it is more of a pinafore style and then I can wear shirts and jumpers underneath.

My third chosen category will be Fashionable Foundations for Frosty Weather, a garment for below the waist.  I shall make a self-drafted skirt with a waistband and tucks for work.  No thick material required as the heating is very effective where I work, so I will probably make it in cotton, unless I am tempted by corduroy whilst online shopping for the navy knit!
I may use the fabric on the right for my skirt.

The last category I shall tackle if I get a chance is Chic Chemises for Cool Climates, which is basically a top of any description.  For this I think instead of making something new I shall re-work the sleeves, shoulders and collar of a knitted jacket that I made but was very disappointed with the final fit.  It's a Debbie Bliss pattern, and I had no idea at the time that she purposely designs her patterns to have excessive ease.  Not just normal wearing ease but 80s boxy shoulders, wearing your Dad's clothes kind of ease.  I won't be knitting her patterns ever again, but I would like to rescue this one item from the bin if I can.

So there you have it, my sewing plans for the next two months.  Here is a link to the flickr group, just in case you were thinking of joining in too, and the link to the original idea is in my sidebar on the right, or you can click here.


Sunday, 8 September 2013

Too much Reading and Not Enough Finishing

I am currently mulling over a toile that I want to get right and am working on three patchwork items - some english paper pieced hexagons, a jelly-roll strip quilt, and a needle-turn wall hanging, but none of them are finished yet.  I still have my crochet flowers to work on too but I'll wait for the weather to truly turn to Autumn before I take these up again.
Three of my current WIP

Instead of actually completing any of my own projects I seem to be spending a lot of time reading about other people's completed works.  This is getting to be a bad habit for me - I read blog posts in the morning before work and then again in the evening when I get home.  The time I use to spend doing or making has now turned into just reading about other people's doing and making. This is not good really and I shall try to limit this - any good ideas you could share about managing your blog reading time?

And yet doing all this reading has led to two very good things recently.


I was reading Jeri's blog post at My Modern Vintage about being stuck in a sewing rut and not having the motivation to get on and do the alterations that she needed to do.  She asked for some advice and she liked my comment so much that she offered to send me the pattern of my choice from her stash!  How lovely was that?  Then not only did she send me the one I chose (pattern on the right) but when I opened the envelope there were my second and third choices!
Thank you very much Jeri! x


The other nice thing that has happened because of too much blog reading is that I was able to offer two stars and a wish (teacher lingo for constructive comments) to Alison who blogs at Another Little Crafty Creation . Alison put all the commenter's names into a hat darth vader mask and drew out my name to receive a lovely package of sewing goodies to celebrate her achievement of 100+ blog readers.  Thank you so much Alison. x
What a pretty bundle: sewing themed sticky notes, two ribbons, chocolate,
1 metre of liberty lawn, dressmakers notebook and hand stitcher's wax,
which I have long wanted to try!
If I can, I am going to try to use the very pretty fabric from Alison to create the pattern that I received from Jeri.

So really, perhaps the time I take to read and comment on blogs isn't wasted time at all.

Monday, 19 August 2013

Simplicity 2444 - A Toile

I have bought the most lovely fabric to make Simplicity 2444.  (I won't share the fabric just yet but the pattern is 1/2 price in the UK at the moment)
It took me a long time to decide exactly which pattern my cherished fabric should be made into, and the ever popular 2444 seemed to fit the bill the best.  There is enough plain space in the bodice to let the fabric 'sing' and enough pleating in the skirt so as not to let the fabric 'scream.'
To ensure that I get a good fit before cutting into my special fabric, I have made a toile, which is a rare thing at Nessa's Place.  I bought a duvet cover from the local charity shop for £1, washed and ironed it ready to sew this weekend.
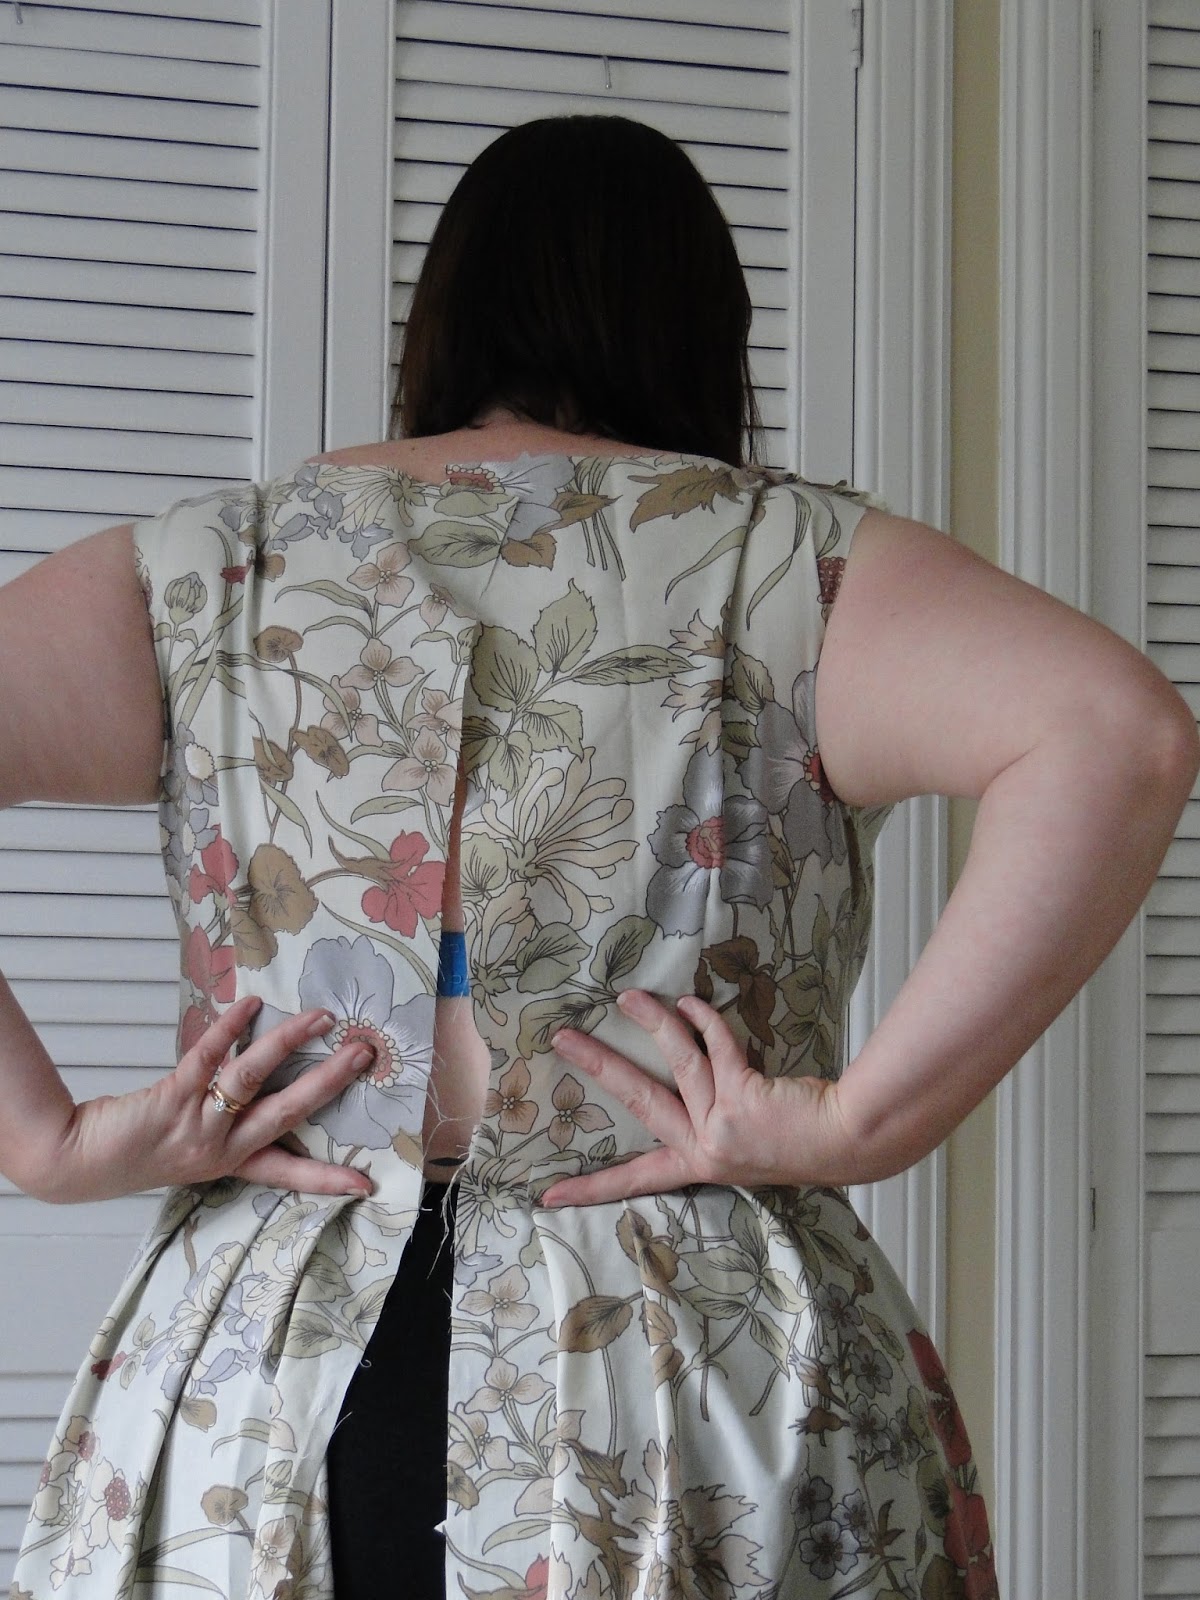
Taking photos of the toile has really helped.  At first I thought I may need to lengthen the waist but seeing it here I think I shall leave it as it is.  The neckline is too wide so I will need to bring it in so that the bra straps are covered.  The shoulders are too wide as well.  I intend to make the version with the small sleeves and I would like the seam not to be falling down my arm.  In fact, looking at the bunching fabric at the arm scythe I would say that I may even need to do a smaller size for the entire bodice above the bust.  Or is there something else I could do to alter that bunching out?
As for the back, there is plenty of seam allowance for the zip above the bust but not at the waist - here the fabric only just meets.  Option 1) loose weight.  Option 2) wear spandex/lycra shapewear Option 3) add an extra 5/8 to the waistline by grading out from the bust to the hip on the side seams.  I think I'll go with option 3.
I am not 100% sure but I do think that this may be my first ever pocket and they were very easy to install.
After I have made the real dress, I think I may finish this one off and make it wearable.  I really love this duvet fabric.
Related Posts Plugin for WordPress, Blogger...